Showing posts with label En francais. Show all posts

Tuesday, September 21, 2010

Artistic Etchings and a Concord Crush

We made this 3 D project at the launch last week and for those who couldnt make it ...
Here's the supplies list:
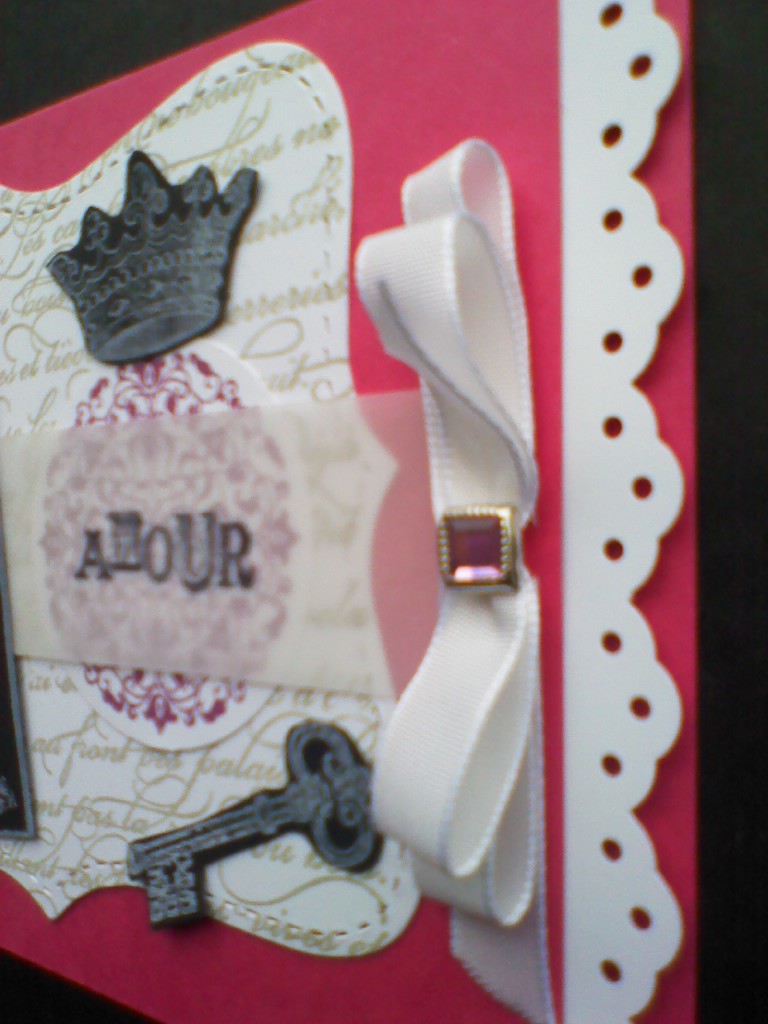
Stampset: Artistic Etchings, En francais background
Cardstock: whisper white, New in-colour: Concord crush
Ink: Concord crush, Marina Mist, Early Expresso
Ribbon: Early Expresso striped grosgrain
Tools: Vintage wall paper textured embossing folder.
Big Shot machine, brad, dimensionals.
12 month Calendar  and a Stampin' Up pen!
I think this idea would be great as a teacher's gift as the end of year present.
Or a calendar for your desk, mind you in a few months you may be wanting to book a holiday to Paris ... to visit the Tour de Eiffel  and a few royale chateaux ... the images have that very detailed and antique look.
I have used the En francais background stamp in Marina Mist with a collage of crowns and key stamps in a kind of bright vintage style.
For the Top note we used a new technique which I call: Inked embossing folder which fairly much describes how it's done.
We inked up the sizzlet embossing folder with concord crush classic ink, just by rubbing the ink pad on the positive side of the folder, and placed our piece of white cardstock inside.
After rolling it through the Big shot machine it comes out with purple ink in the negative part of the texture...
OK you had to be there, you have to see it in real life ...
Concord Crush and Marina Mist just go so well together and the ink just washes off in water.
Be back with another card tomorrow.
Enjoy!

Monday, August 30, 2010

Artistic Etchings with Melon Mambo

Ever dreamed of making a card or scrap page in your sleep?
This is a brand new stamp set from the 2010-11 Idea Book and catalogue. I couldn't go past this stamp set as it will go with the En Francais background stamp and has this lovely circular medallion, crown and key.
I stamped the Eiffel Tower in white craft ink on to Basic black cardstock.
The Crown and key are done in white ink on black too, before being cut out and attached to the top note with dimensionals.
I have stamped the AMOUR ("love") sentiment with black stazon ink onto velum cardstock.
This is a nice way to make a ribbon bow, I think, you just fold the ribbon and cinch it in the centre with a rhinestone brad and mini glue dot it to the card.
 

Card Recipe:
Stampsets: Artistic etchings, En francais background.
Cardstock: Melon Mambo, Whisper white, Basic Black, Velum cardstock .
Ink: White craft ink, Rich Razzleberry, Soft suede
and black stazon ink..
Tools and accessories:
Eyelet border punch, white taffeta ribbon, square Rhinestone brad, dimensional adhesive.
Big shot machine and top note die cut.

Wednesday, July 21, 2010

Kissed En Francais Medallion

Here is the second workshop card we made last weekend.
It features the wonderful "Medallion" stamp AND the technique of Kissing stamps.
The medallion stamp was inked with baja breeze then "kissed", that means touched lightly, with the en francais stamp that was inked in Old olive ink.
The stamp is now ready to apply to your very vanilla card front.
The sentiment is stamped below the medallion.
We used "Heard from the Heart" stamp that says "May all your wishes come true"!
Lastly we tied a strip of Old Olive Grosgrain Ribbon around the whole card and that was it.
Quick and fun!
Here is a similar version in Red with a Christmas spin to it.
Send me an email nerida_carter@hotmail.com if you'd like to have a workshop at your place.
We can make one or two cards, and I can demonstrate the BIG SHOT machine.
Or perhaps you're thinking its time to start on those Christmas cards?
We can do a Stamp A Stack of cards which is where for $15 you can make 6 cards of 2 different designs.
Begin your Christmas cards now to avoid the mad rush later.

Saturday, July 10, 2010

July Challenge

Well another cold and wintery Saturday in July ... what else is there to do, but make a card.
In between playing "shops" and Monopoly on the lounge room floor (as you do) I answered the challenge though the photos are a bit dull due to the overcast light outside, I did my best with many interuptions.
The challenge (set by Felicity this month) is to use expiring Stampin' Up colours that you will miss once retired and  stampsets you want to see stay in the new catalogue.
I've chosen Lovely Lilac cardstock as a card base. Why doesn't it look so bold and bright in the photos?  Staying with the bold bright colour theme I chose Orchid opulence and Pink passion for my ink colours.
The stampsets are: Tiny Tags and The medallion stamp from the Autumn - Winter mini catalogue, and En francais background stamp from the main Idea book and catalogue.
I think I will cry if these stamps don't continue on. The tiny tag set has its own new style "jewellery tag" punch, so it just has to stay!!!
It was a bit of a chaotic layout - so I saved it with the strings attaching behind the circle ice rhinestone (my favourite colour is the purple) and the gorgous silver filigree brad combination in the centre.
Card Recipe:
Stampsets: Medallion, tiny tags, En francais
Cardstock: Lovely lilac, whisper white.
Ink: Lovely lilac, Orchid Opulence, Pink passion, White craft (for the medallion).
Tools and accessories: Jewellery Tag punch, Circle Ice rhinestone brad, Filigree brad.
Embroidery cotton.

Tuesday, June 29, 2010

Technique: Spotlight with watercolouring

Have you tried this technique?
Stamp a card front or ATC (thats an Artist Trading Card) with monotone colours (I've used Sahara Sand and close to cocoa ink for the back ground stamping). You could use black or grey.
Then, stamp another of the same image on cardstock and punch it out.
Mount it on a coloured circle (a little larger than the image circle), and water colour in the details.
I have used Rich razzleberry ink to water colour my rose bud using an aquapainter pen. The more water you use the lighter the colour.
Doesn't it bring out this lovely "Embrace life" Rose bud beautifully?
I have made eight of these ATC samples to swap with.
 It was the June technique of the month.
With water colouring every one is definitely different.
Project Recipe:
Stampsets: Embrace Life, En Francais background stamp.
Cardstock: Close to Cocoa, Sahara Sand, Rich Razzleberry.
Ink: Close to Cocoa, Sahara Sand, Rich Razzleberry.
Ribbon: Kraft tafetta
Punches: Word window, 1 1/4" and 1 3/8" circles.

Monday, June 21, 2010

All a flutter framed butterflies...

Here we are again, the beginning of the week ... I hope you enjoyed your weekend?
I want to show you something I came across while blog-surfing my way overseas ...
my internet blogging takes me to sites in the US and the UK.
I want to thank Jo Dumbleton http://www.stampin-n-stuff.blogspot.com/ for this great idea.
Hers had another layer of words going around the edge, but that would have taken another 20 minutes of stamp-a-ma-jig fun, which I didnt have the extra time for and besides I like to keep it simple.
I bought a pack of three sqaure box frames a while ago now, so I easily stamped these pictures and  clicked the 6x6 inch cardstock into the back and now they are ready for hanging.
Sing out if you see any more of these white frames for me wont you?
The backgrounds are stamped in creamy caramel and soft suede and the left hand one has some pink pirrouette on the very vintage wheel. 
My butterflies are stamped in stazon black ink then watercoloured with the classic inkpads and an aquapainter. The one above is in kiwi kiss and soft suede.
Pumpkin pie and rose red.
Pacific Point and kiwi kiss.
Shades of Rich Razzle berry layed over and over.
The butterflies are set higher than the cardstock with dimensionals.
I'd like to do a frame with actual butterfly colours, like from a book or something.
Stampsets used: En francais background, Very vintage wheel, All a flutter.
Cardstock: Whisper white (textured and plain)
Ink: Stazon black and the other colours ... you can guess what I left out.
Tools: Aquapainter pen, or you can use a paint brush....
Time taken: All Sunday afternoon, just watercolouring and cutting - Enjoy!

Thursday, November 26, 2009

Pacific Point Parisian breeze ...Oohh la la!

My favourite colour ... (after purple) is this Pacific point blue. It reminds me of the ocean, an island in the pacific, or the mediteranean sea. The textured patterned paper is called "Parisian breeze" because it is a combination of Baja breeze, chocolate chip and kraft coloured patterns. And when it came to choosing a background stamp for the baja breeze cardstock it just had to be "en francais". I have matched the ribbon with the Pacific point and tied it with a piece of white grosgrain... kind of french sailor suit now that I think of it. Here are my two versions side by side.
And another two variations on the same theme, the same layout reversed and using different colours to contrast with the Pacific point and baja breeze.On this one my embellishments were all mounted on basic black cardstock and then I stamped the best wishes on acetate with the white stazon ink. Love that contrast.
And for Variation 4... has the ribbon tucking beneath a cut out belt buckle thingy and I have sponged the edges of the scallop punch and attached it with a flower brad in chocolate chip to match the background stamping.The chocolate corner is made from a scallop square punch cut in quarters, works nicely on photos too.And for completeness here are the four versions just to show how much I like to photograph my cards... you can never have too many pictures can you?

Thursday, September 24, 2009

Sketch challenge: Parisian Breeze

This sketch challenge is from Inkspirations. It is my first attempt at one of Makeeshabyl's sketch challenges where I actually am playing along. So above is the sketch #13 and below is my challenge entry.
When I saw it I instantly thought squares of textured patterned paper = Parisian Breeze Specialty Designer Series Paper!
Why is it so special you ask?It is double sided, printed on textured, cover-weight cardstock which means it is really thick and tactile - you just want to touch it.I have cut the three squares with my square punch, mounted them on black cardstock and raised them up on dimensionals to give them height. The sketch has has a horizontal strip on the side so I used my Eyelet border punch to make a frilly piece of black lace (I thought it went with the french Parisian theme)... and then wrapped a piece of Pacific Point grosgrain ribbon around the side. Which I have threaded through a styled silver slide for a extra focal point. Materials used:
Ink: Black Stazon
Stampset: Enfrancais Background stamp
Cardstock: Pacific Point, whisper white, Baja Breeze and Basic black.
Designer series Paper: Parisian Breeze
Pacific Point Ribbon
Styled silver hodgepodge ribbon slide
Eyelet border punch
Square punches: 1 1/4", 1 3/8".
Dimensional and snail adhesives.

Thursday, August 20, 2009

Three little words... thanks so much

Today's card is a Thank you card.
It is made from 1/3 of a piece of A4 cardstock (Basic grey).

I think you should always have a small stack of thank you cards for those times when someone does something nice and if you have to go home and make a card, it usually gets left till later, and then you forget and the moment is lost. So, seize the moment I say.
In these days especially, no one expects a thank you card, let alone a handmade, hand stamped card to say I appreciated what you did for me.
I think it is a really nice guesture that is often forgotten.
At the top of the card I have made a small strip of velum, which I have stamped the en francais stamp in white stazon ink. Then when dry I stamped the "three little words" in black stazon.

The inside reads "thanks so much" in black stazon ink ... other stamps in this set say: so very sorry, I miss you, I love you, you you you, and Thinking of you.

Materials:

Stampsets: Three little words, en francais background.

Ink: white stazon, Black stazon.

Cardstock: Basic grey, velum.

DSPaper: Urban Oasis

Tools and accessories: Ribbon - black grosgrain, Eyelet border punch, 1 1/4" circle punch.

Wednesday, July 29, 2009

Filigree flowers - En francais !!!

Well the holidays are over and family is back at school - I didnt get much stamping done in the last two weeks but had a great time with my daughter at home and with friends.
Today's card started out as a CASE from Claire Daly (her response to an image challenge) so I shared her idea of the Enfrancais background stamp on velum as a layer and the strip of Designer series paper beneath then did my own thing from there.
I chose the Pacific Point blue card base as it would contrast nicely with the white stazon ink on the velum. The patterned paper is in baja breeze from the Urban Garden DSP pack.
I have used the Best wishes sentiment from the "oval all" stampset in the new mini catalogue (out on 1st of August) as it fits beautifully into the large oval and the new oval scallop punch - this is a must have punch I promise you....
I have made this gorgous little flower with two layers of kiwi kiss cardstock and one of velum punched out with the 5 petal flower punch. The centre is made with the gorgous filigree metal brad set. The whole flower is raised up with a dimensional.
Oh and the ribbons are Pacific point wide grosgrain and Old olive grosgrain.
Enjoy!

Thursday, July 16, 2009

A fresh cut for a fabulous friend

I have to say this was a very quick card to make. The fresh cut cards with a pre - punched flower in the centre coordinate with the flower punch.
The flower is cut out of a spare piece of velum left over from another project. If you look very closely you will see it has the en francais stamp in white stazon ink stamped on it.The small purple flower was punched using the one of a kind punch. I have attached the flower to the card with a small white eyelet and a dot of crystal effects with a clear rhinestone ont the top. Behind the flower cut is a piece of lovely lilac cardstock stamped with the Enfrancais background stamp in elegant eggplant.
On the top layer of white, it is not your computer screen or your eyesight playing up ... I have stamped the background stamp in almost amethyst and eggplant ink.
Recipe:
Stampset: Oval all, En francais background stamp.
Cardstock: Fresh cut note card, velum, Lovely lilac, whisper white.
Ink: Almost amethyst, Elegant eggplant.
Tools and accessories: Eyelet border punch, scallop oval punch, large oval punch, flower punch, one of a kind punch, crop a dile (for hole punching and eyelet setting). Small white eyelet, clear rhinestone and crystal effects, dimensional adhesives.

Saturday, June 13, 2009

Sisters scrapbook page in bella bleu

I haven't forgotten my scrapbooking - I have many pictures to scrap, just so little time.
Scrapbooking contains more elements and usually a title to be stamped and cut - so they take a little more time for me.
This is a photo of my beautiful sister at her birthday lunch ... it was a lovely sunny day at a friend of hers home, a simple but wonderful lunch, champagne, chocolate cake and cups of tea. Don't mention that I was having such a relaxing lovely afternoon that I was running late for school pick up... !
It is fairly simple with the heading stamped on vellum, attached with silver brads. Two paper flowers attached with build a brad centres. I have used circles cut from the bella bleu paper. The flowers are punched with sahara sand cardstock, stamped with the en francais background stamp in not quite navy and then the petals cut, ans scored with the bone scorer from behind. The second flower I actually put through the crimper ... either works, I think.
The cardstock is Not Quite navy textured paper, Sahara sand, Bella Bleu Designer series paper.
Vellum for the heading and fifth avenue floral flowers. The title is stamped with Lovely Letters stampset.
I think I might add some hidden journalling about the day, the date, the place, perhaps a photo of the other people there, why this was a special birthday (a milestone one ... )